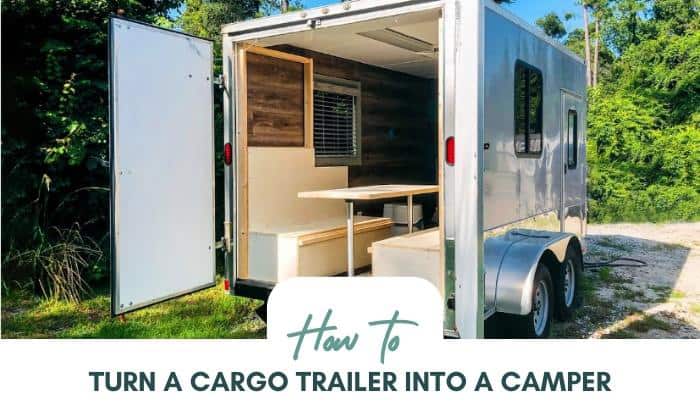
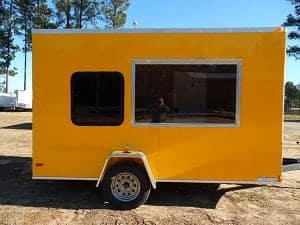
Do you have a cargo trailer that’s lying around your property? Do you look at it and think, ‘I can make this into a camper.’ If you do, the question is how to turn a cargo trailer into a camper? You’ll find the answer to that question as you continue reading.
Creating a camper from a cargo trailer requires you to take measurements, draw a plan, find and purchase essential items, and install each component.
It might look like a challenging endeavor, especially for beginners. But follow this guide, and you’ll enjoy your new camper sooner than later.
Page Contents
Steps to Turn Your Cargo Trailer Into a Camper
What You’ll Need
The first step to a cargo trailer camper conversion project is to create a checklist. Without it, you’ll likely forget some important items, which can lengthen the time spent finishing the operation.
Take note that the items needed to complete the cargo trailer conversion differs for each person. However, it’s best to prioritize the essentials, such as insulation, electricity, toilet, and living quarters.
- Cargo trailer conversion plans: Ask yourself certain questions when drawing an idea for the cargo trailer camper.
These inquiries may include the following: How many people will be living in the camper? How do you want to cook your food? Are you planning on living inside the converted camper permanently? What activities do you want to do in the vehicle?
Figuring out the answers to these questions will help you determine your priorities for the project.
- Insulation: Insulation options for campers are plenty. These selections can range from inexpensive caulking to fairly costly window and door installations.
Make sure to seal most if not all exterior compartments. These sections can leak hot air into the camper, increasing the risks of heat strokes and equipment failure.
Also, don’t forget to insulate the walls. You can use foam panels or spray foam if you’re on a relatively tight budget. Otherwise, consider spending the extra cash on fiberglass as it can provide better insulation than the other options.
- Electricity: Electricity for converted cargo trailers tends to come from a 12-volt battery connected to an inverter. But you should decide if you want the supply to originate from solar panels or a lithium RV battery.
Both electrical sources have their pros and cons. For instance, solar panels provide an eco-friendly approach to providing your cargo trailer with sufficient electricity. However, the components can be expensive.
On the other hand, a lithium battery can be a relatively inexpensive choice. But it also means that you should always have a spare battery lying around in case the other one runs out of energy.
- Plumbing system: Plumbing for converted cargo trailer systems generally falls under two categories: kitchen and toilet.
For the kitchen, you can choose from a myriad of RV faucets and sinks on the market. Some selections even come at reasonable price points, which are perfect if you’re watching your budget.
As for the toilet, you can either use a porta-potty or the traditional compost toilet. The decision should depend on the available space in the vehicle.
For example, if you’re going for a 6×12 cargo trailer conversion, you may want to opt for the porta-potty. Otherwise, if you’re doing a 7×14 cargo trailer conversion project, a compost toilet might be a better option.
- Living amenities: Make your new camper more comfortable than before by adding comfort features like a bed, cabinet, chair, and table.
One reasonably inexpensive option for your bed is a futon mattress. You can change that to a platform bed if you have the extra cash.
As for the cabinet, you can buy a new variant that fits your camper in a home or hardware store. But you can also save cash by buying a second-hand cabinet from a garage sale or thrift store.
Finally, you can create DIY chairs and tables if you have the time and skill. Otherwise, you can buy these items from a trustworthy supplier.
Aside from the items mentioned above, also consider other essentials, such as vents, fans, and other mechanical improvements you’d like to add to the camper.
Step-By-Step Instructions
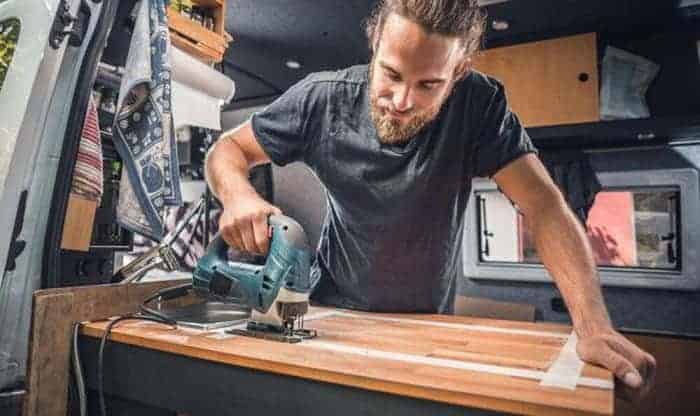
After gathering the necessary items, you can convert your cargo trailer into a livable camper. Remember to follow your drawn plans to ensure that you won’t commit costly mistakes.
Step 1: Remove the Walls
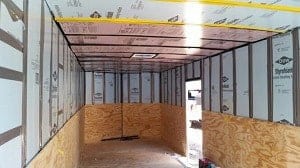
Cargo trailers generally come with plywood walls, which you need to remove. Otherwise, you’ll have difficulty installing your insulation units. Plus, you’ll also need to rip out the plywood ceiling.
You can rip off the plywood using your bare hands if you’re strong enough. Another option is to use a claw hammer to help you with this step. Once the plywood’s removed, you can install the insulation.
Step 2: Make Holes in the Windows
Assuming that your cargo trailer doesn’t have windows yet, you’ll need to cut holes in the vehicle for those openings. Ensure that those holes have the measurements needed for your chosen windows.
Draw the outlines on the cargo trailer with a pencil. Then, use a jigsaw to cut along the guides. Install the windows, and make sure to seal the edges with caulking or flexible sealant.
Step 3: Install the Electrical System
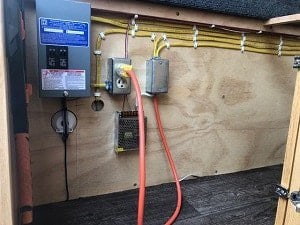
Installing the camper’s electrical system isn’t as complex as you might think, regardless of your choice of electricity source. Keep in mind that it’s best to connect the wirings to the correct outlets for the electricity to flow in the vehicle properly.
Step 4: Add the Plumbing
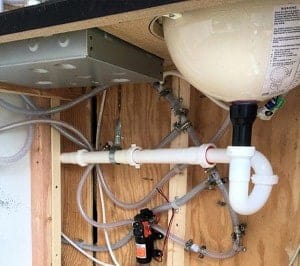
Many cargo trailers have low clearance, which makes it fairly challenging to add water tanks underneath the vehicle. Therefore, it’s important to take note of your chosen water-providing systems, namely the toilet and kitchen sink.
Still, one of the easiest techniques to add plumbing when making a camper out of a cargo trailer is to install 6-gallon water jugs in the vehicle. Then, fill those containers with fresh water every chance you get.
Connect those jugs to a pumping station, which should attach to the water-providing appliances and devices in the camper. Also, if you’re planning to install a water heater, make sure that it has sufficient ventilation to allow the hot vapor to escape.
Step 5: Build the Kitchen
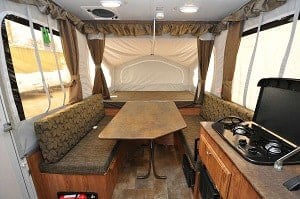
Start by installing kitchen cabinets. Next, add your preferred kitchen appliances, such as a stove, oven, exhaust fan, and coffeemaker. A deep bar sink is also ideal for small campers because it helps optimize the available space.
You can also design your camper’s kitchen to store some appliances away to help save space. A storable cooktop is an excellent example.
Step 6: Place the Bed

The last step to make your converted cargo trailer is to mount the bed. Again, follow your drawn plans to ensure your chosen bed fits inside the camper properly.
You may also consider using a foldable bed to help optimize the limited space. For example, install a sofa bed, which allows you to have a comfortable seating and sleeping area without buying two pieces of furniture.
Conclusion
Congratulations on arriving at the end of this guide! Did you like this article? If so, don’t forget to share it so that your friends and family will also have an idea of how to turn a cargo trailer into a camper properly.
Also, what do you think about this guide? Don’t forget to share your thoughts in the comment section.
Keep in mind that converting a cargo trailer to a camper or motorhome can take time. Don’t rush the process or you might commit some costly mistakes.
“Hi, I’m Francis’ husband—Calvin. Our story began with our shared passion for traveling. I have had a career journey for over 11 years at Ford Motor Company, where I took on the role of BMS SW Process Engineer.
Together with my wife, I have dedicated countless hours to exploring every nook and corner of the world. Ten years living in an RV may seem long, but time seems to fly by when I’m doing what I love with the person I love.
FMCA’s 103rd International Convention & RV Expo in Gillette, WY,
Like my wife, I hope to help you see the beauty of traveling off the beaten path by sharing insights into this lifestyle. In addition to my corporate roles, I also launched our website – Outdoorbits, in 2015 and continue to contribute my knowledge and skills to the present day. And I’ll be completely honest with you—no hiding the truth or sugarcoating the possible challenges.
So, if you want to run away from the busy lifestyle to embrace nature, I’m your guy.”