 RV water lines are an important intergral part of an RV’s plumbing system. Having air leaks isn’t something you want to deal with on the road. If you’re taking time away from home, you’ll want to be sure that the water supply in your RV is nice and tight.
Knowing how to bleed air from RV water lines may seem simple and easy to do. However, this isn’t always the case. We’ll walk you through what you can do to ensure your system is nice and secure against getting air sucked in around pipes where they connect.
Page Contents
Steps to Bleed Air From Your RV Water Lines
What to Prepare
When bleeding air in RV water lines, you don’t need to use any specialized tools. Just fill your RV’s fresh water tank full and bleed out any air from the system.
Step-by-Step Process
Step 1: Diagnose problems
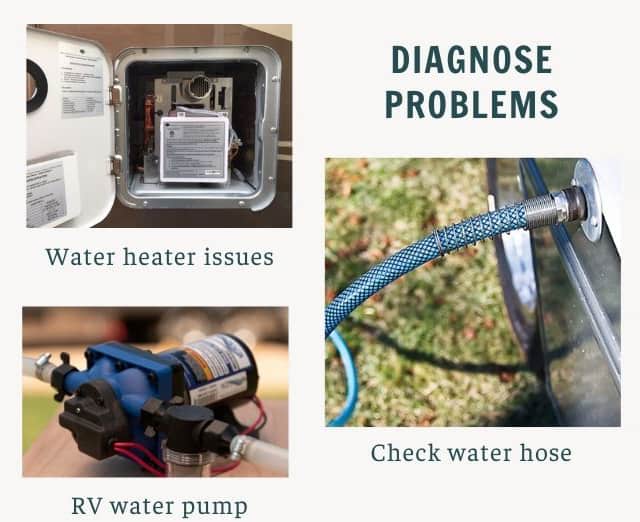
The first step to get air out of camper water lines is to determine what is causing bleeding water lines. To diagnose the root cause of the problem, follow these steps to access water lines in RV:
- Check the water hose. A leaky hose can draw air into the lines very easily and can make a lot of noise when it happens. Make sure that all hoses are securely attached to fittings and don’t have any holes or cracks in them.
- The next step is to check for RV water pump sputtering. You want to make sure that it’s working properly and not leaking any fluids onto or into other components inside the engine compartment of your RV. If there are any leaks, replace them immediately.
- If you’ve ever seen your RV water pump sputter when you turn on the hot water, then the problem lies with your water heater.
Step 2: Fill the water tank to maximum capacity
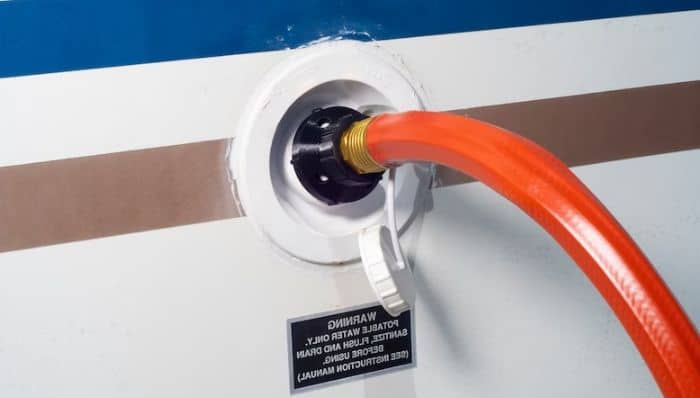
- You should fill your RV’s water tank before purging air from the water lines. This will ensure that there is enough pressure in the system to push out all the air.
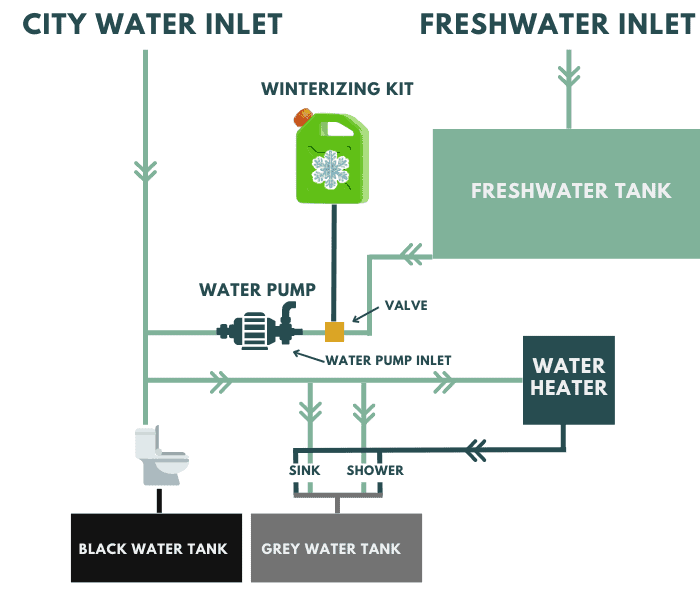
- You can also use pressure from the city connection to bleed air from water pipes. To do this, you’ll need to establish a city water connection.
Step 3: Start purging the air from your RV’s water lines
- Simply turn on the RV’s water pump and the faucet farthest from it.
Close the other faucets and water fixtures. Make sure you are familiar with the location of all valves and levers, as well as the location of the shutoff valve. - In order to purge air from your lines, you need to close off all sources of water in order to prevent any backflow into your system.
- Let the water run until you see no more bubbles or hear sputters coming out of your faucet.
If you can still hear the RV water pump spitting air after letting the water run for some time, it means there is still air in your lines that needs to be removed. - You can repeat this step as many times as needed until you no longer hear any sputtering sounds when opening faucets or flushing toilets.
Step 4: Finish bleeding all of the air through the rest of your water system
- Close the furthest faucet.
- Open up each faucet in the order furthest from the water pump and turn on the water until it flows freely from each fixture without any resistance from air bubbles or drops of water falling back into the sink or toilet bowl.
- You should hear a steady stream of running water coming from the faucet when this happens. If water not flowing in the RV, try opening up another fixture until you do hear this sound coming from one of them when they’re turned on full blast with no resistance from flowing water.
Important note:
- When your RV water system is still sputtering after every few minutes, the best approach you can take is to connect it to a pressurized source of water.
- Once you’ve connected everything up correctly, turn on all the rig’s water outputs, which include sinks, showers, toilets, and any other fixtures that use water.
How to Stop Air From Getting in RV Water Lines?
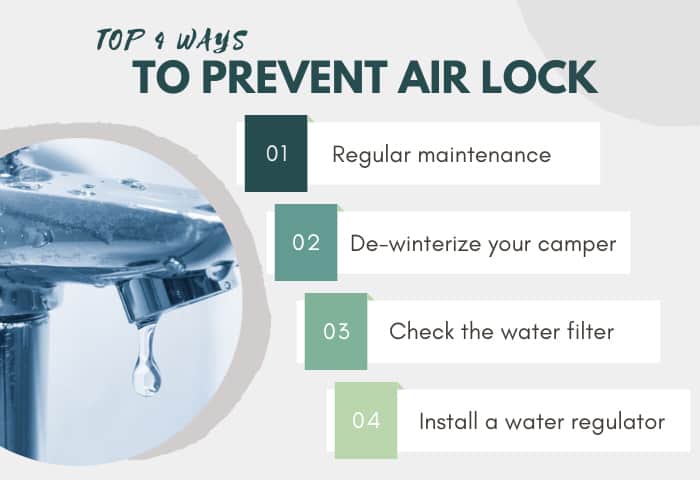
1. Regular maintenance
The best way to prevent air lock is by doing some routine maintenance on your RV. There are probably some things that need to be fixed or replaced. For instance, if any of your hoses are cracked or leaking, this will let in air which can cause problems with your water lines.
2. De-winterize your camper
De-winterization is a process that allows you to remove air from your RV’s plumbing system and replace it with fresh water, after sanitization, so that it doesn’t freeze during cold weather.
3. Check the water filter
Make sure that your water filter is working properly. A clogged filter can cause air to enter the line as water passes through it during use.
4. Install a water regulator
These devices reduce the water pressure to your RV’s plumbing system, which helps prevent air from entering the lines.
Helpful Tips and FAQs

How long does it take to get air out of water lines?
There are many variables that affect how long it will take such as the number of valves and hoses in your system. From the processes detailed above, it can take anywhere from a few minutes up to several hours.
How do you bleed air out of water pump in an RV?
If air continues to find its way back into the water lines after you purge the system, check your water pump for gaps or holes and seal them.
If you’re done with the sealing, it’s time to disconnect the pipe from the main water pump.
- Start a new connection to the pump with a hose that is long enough.
- In a container, fill it with fresh water up to 12oz or so.
- Lift the free end of the hose high above the water pump and start pouring the water into it.
- Turn on the pump with your finger serving as the stopping gap of the hose.
- You’ll eventually feel the water rise up to your finger. By then, you can turn off the pump and reconnect the outgoing pipe.
How do you bleed air pocket in RV water heater?
- If there is air in hot water lines such as the water heater, turn off the heater’s power.
- Wait for at least half an hour to 40 minutes for the stored water to reach manageable temperatures. You can tell if it’s cooled down enough if you can freely touch the sides without the burning feeling.
- Cut off power to your RV’s main water supply.
- Open a faucet to relieve all pent-up pressure.
- If your water heater has air in it, pressure valves must be turned off as well. Wait for all remaining water to empty itself out.
- Once all the water has disappeared, you can proceed to close the valves and the faucet.
- You can now restore the power back to your main water line.
- Finally, when the water tank of your heater is at maximum capacity again, you can restore its power to get it operating as usual.
How do you prime an RV water pump?
You’ll need to fill up your freshwater tank until the gauge (if any) registers full.
The best way is to turn on the water tap for one source only, such as the shower or bathroom sink. Keep all others closed off.
- To begin priming, switch on the water pump and let it run for about 5 minutes.
- Don’t forget that it might take a while for the water to run its course from the tank, through the pump, and down the faucet.
- Repeat the process for other taps.
How do I find an air leak in my RV water system?
Listen for RV water sputtering. If you hear a hissing noise coming from your plumbing when you turn on the water, there’s probably an air leak somewhere. The trick is to narrow down where the air is coming from.
Conclusion
Air trapped in the water lines can cause all sorts of problems, including not being able to get enough water pressure out of your faucets and showers, having difficulty flushing toilets, and more.
Bleeding the air out of your RV’s water lines reduces the possibility of them damaging your RV’s pipes as well as enabling your water to flow freely and without interruption. Hopefully, this article gave you a few pointers on how to bleed air from RV water lines.

My career journey has been marked by a variety of roles. I served as a Personal Trainer for Children, Fitness Instructor, and Home-Based Consultant in Detroit Wayne Integrated Health Network.
More than ten years of traveling in my caravan have lent me a deep appreciation of freedom. Without the shackles of being tied down to one place, I get to explore many parts of the world and relish the exhilaration that comes with discovering new things. Throughout my journey, I have been a member of FMCA (Family Motor Coach Association) since 2020. Thus, living on the road has never become boring for me.
As someone with a burning passion for traveling, I want to inspire others to adopt a nomad lifestyle to appreciate the beauty of the world. This, of course, requires a functioning vehicle that can always make you feel at home, even when you’re far away from modern life.
Therefore, I seek to put my experience to good use—helping you with your adventure on the road. As a result, I launched and managed the Outdoorbits website, where I likely share my enthusiasm for outdoor activities and health-related insights.