As an RV owner, you realize how important it is to keep the battery charged before any extended trips. You might therefore wonder if it’s possible to hook your trailer up to a regular outlet and charge it that way. Unfortunately, doing so isn’t advisable.
Your home outlet comes with three prongs and has 15 or 20 Amp service, as compared to the four-pronged plug requiring 50 Amp service of your RV. Charging the trailer with this electrical supply mismatch can trip your house’s circuit breaker and cut off the supply to your RV. One way to avoid this is to limit the use of appliances like air conditioning and hairdryers in the trailer.
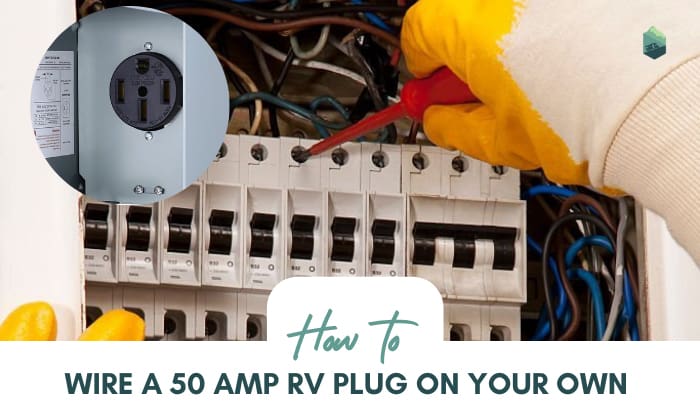
However, another practical solution to this is installing and wiring a 50 Amp RV outlet outside your garage or wherever you often find yourself parking your RV. How to wire a 50 amp rv plug?. The technique of doing this is pretty straightforward and only involves installing a plug, a breaker, and finally wiring the two together. Get your electric toolbox ready, follow the wiring instructions in the next section, and you will have yourself an RV outlet in less than a couple of hours.
Page Contents
- 9 Simple Steps to Wire 50 Amp RV Plug
- What You Will Need to Prepare
- Step-by-step Instructions
- Step 1: Cut off your home’s power supply
- Step 2: Remove the breaker panel cover
- Step 3: Double-check whether the power is off
- Step 4: Inspect the breaker panel for any vacant slots
- Step 5: Install the 50-Amp breaker in the vacant slot
- Step 6: 50 Amp breaker wiring
- Step 7: Put the panel cover back on
- Step 8: Testing your newly built 50 Amp RV plug
- Step 9: Using your new RV plug for the first time
- Conclusion
9 Simple Steps to Wire 50 Amp RV Plug
What You Will Need to Prepare
On top of all the tools that are required for this tutorial, safety comes first. It is recommended that you take safety precautions at every step of this guide and be aware of the lethal damage caused by electricity if the instructions are not followed properly.
Other than that, there are a couple of things you need to get from your local Home Depot or on Amazon. These include a 50-amp 120/240-volt circuit breaker (double hot-pole), a NEMA 14-50R receptacle, and a four-conductor wire. It is recommended to use a six gauge wire, but in case yours run longer than 50 feet, get the four gauge.
The NEMA 14-50R receptacles are often confused with the 10-50R one, which is commonly used for dryers. This type of outlet supplies a current of 240V, whereas all types of RV, regardless of their size, require 120V current. 120V appliances plugged into a 240V source will use the power four times faster, which leads to overheating, quick burnout, and potentially fire hazards. Please keep that in mind when doing your shopping.
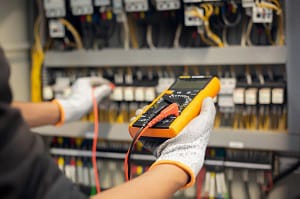
And depending on whether you want to wire your RV plug on your house’s wall or on a pedestal like in a camp, you might need to buy an RV hookup pedestal in addition. Whichever the case, make sure you have a basic household electrical toolkit and a test light/voltage meter. They double-check whether a circuit breaker box still has a current running through after it’s been switched off, and therefore they act as an additional safety measure.
In short, these are the things you will need:
- 50-Amp 120/240-Volt double hot-pole circuit breaker
- NEMA 14-50R receptacle
- 6-gauge four-conductor wire
- RV hookup pedestal (as needed)
- Outlet box and cover (as needed)
- Electrical conduit (as needed)
- Basic household electrical toolkit
- Test light/voltage meter
- Screwdriver
- Wire cutters
- Wire strippers
Step-by-step Instructions
Step 1: Cut off your home’s power supply
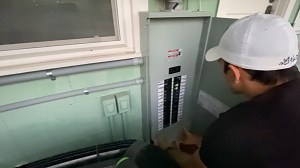
Locate your circuit breaker box, open the covering, and look for the main breaker, which is typically the largest one at the uppermost position of the panel. Its amp value is likely marked as 100 or 200. Go ahead and flip the switch to the OFF position to cut off all electricity.
As for me, I also have the habit of turning off all screen monitors that are currently plugged in, such as computers, before turning off the main breaker, as they can be damaged by a sudden loss of power.
Step 2: Remove the breaker panel cover
Pick up a screwdriver and unscrew two screws at the bottom of the panel. Support the panel cover tightly with one of your arms as you remove the two others at the top. Care should be exercised to hold the panel cover, as dropping it would result in the breakers being damaged.
Step 3: Double-check whether the power is off
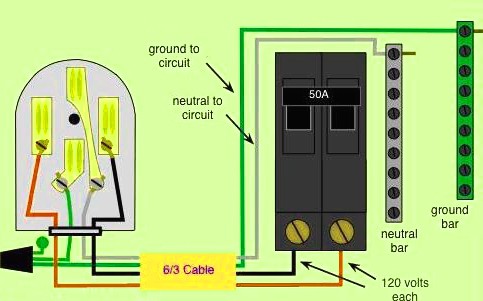
If you’re using a test light, make sure to set it to the highest AC voltage range available, at a minimum of 120V. As for meters, bear the following color scheme in mind, as it would be handy to follow the 50 Amp RV outlet wiring diagram later on.
- The bar connected to bare or green and white wires is ground.
- The bar connected to just green, just white, or just bare wires is neutral.
- The screw terminal connected to black, red, or blue wires is hot.
Touch 1 probe of your meter to ground or neutral, and the other one to hot. If it says anything more than 120V, that means power is flowing through the breaker, and it is not safe to proceed. Otherwise, you can safely move on to the next step.
Step 4: Inspect the breaker panel for any vacant slots
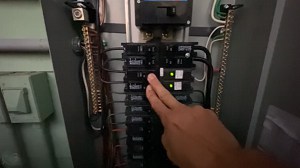
In this step, locate the desired position to mount your 50 Amp breaker. Have a look at all the blank areas in the circuit box to determine your preferred position. Some circuit boxes, however, cover these empty slots with knockout plates. These plates can be removed as we take off the entire panel cover in the next step.
In case there isn’t any available slot left on your breaker arrangement, you must get an extension installed before continuing this article. To do this, either call an electrician or follow the instructions on how to add a sub-panel breaker box.
Step 5: Install the 50-Amp breaker in the vacant slot
Find that 50-Amp double circuit breaker that you have prepared earlier. Set the breaker handle to the OFF position if it hasn’t been already. Align it with the bars in the panel and press the breaker, so it’s firmly attached to its position. Don’t be forceful but instead, apply gentle pressure with your thumb until you can feel a snap indicating it has sat firmly onto the bus bar. Do not screw the breaker into the panel.
Step 6: 50 Amp breaker wiring
Wires should neither be connected to the outlet nor the breaker BEFORE you have run your wire and have them in place.
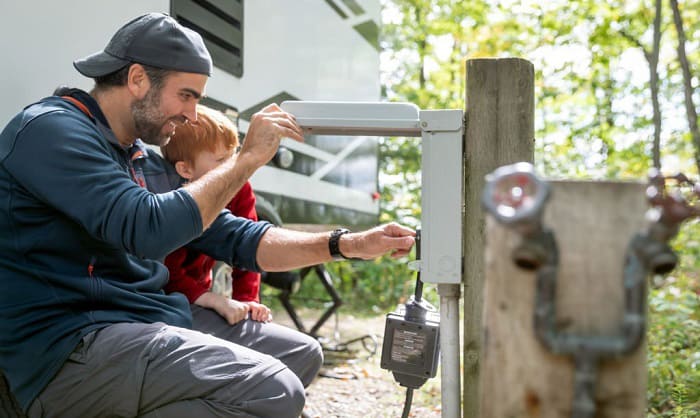
Depending on whether you want to wire a 50 amp RV receptacle on a pedestal or on your wall, you will have to either set up a pedestal hookup (by following the manual instructions that come with it) or install an outlet box and run your wires through the appropriate conduits.
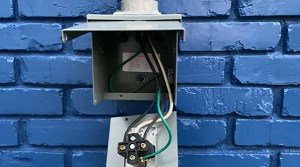
Once set up, the plug is now ready to be wired. Feed the red and black to the side terminals of the receptacle (colour-coded as brass). Don’t worry about which side which color goes to, as a pair of 110V is being supplied through both of these wires. Next, connect the U-shaped side to the bare (or green) wire, which is a half-round receiver. The white wire goes directly below the bare (or green) one and is the neutral wire.
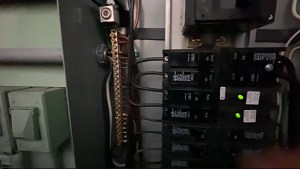
At this point, the wiring on the outlet’s side is done, and we can move on to wire the breaker’s side. This is done firstly by loosening the screw over the breaker’s connection terminal. Without the need to bend the wire into a hook, insert the red and black wires to the two terminals on one side of the breaker. Connect the white wire to the neutral bus. Connect the bare (or green) wire to the grounding bus. Finally, tighten the screw until snug, and you can consider it done.
Step 7: Put the panel cover back on
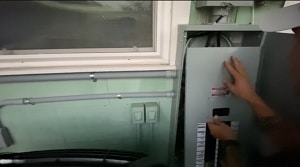
This is the complete reverse of step 3 as we are finishing our little DIY project. While holding the cover and pressing it tightly against the box with one hand, use the screwdriver on the other hand to reattach the screws one by one. Make sure all of the screws are nice and tight, and none of the wires is exposed.
Step 8: Testing your newly built 50 Amp RV plug
This important step will ascertain if you have followed the above steps correctly and ensure your RV can safely be hooked up to your outlet. So, switch the main breaker, flip back on, and switch on the newly installed breaker that is now serving the 50 amp outlet. With the use of a voltmeter, measure the voltage at least two times for each of the following parameters.
- When both positive and negative probes are placed in the line ports, the meter should read 240V.
- When the positive probe is placed in the line port and the negative probe is placed in the ground port, the meter should read 120V.
- When the positive probe is placed in the line port and the negative probe is placed in the neutral port, the meter should read 120V.
- When the positive probe is placed in the neutral port and the negative probe is placed in the ground port, the meter should read 0V.
In order to provide an extra layer of security, the pro tip here is to plug in a 50 amp RV surge protector. The surge protector has LED readouts that let you know if there is an issue with the receptacle you are plugging it in. In fact, it is always a good idea to use an RV surge protector when you are plugging in your RV to any outlet. It only takes one large surge to burn up your entire RV electrical system. Anyway, once the green light of the protector lights up, everything is okay, and your plug is set to go.
Step 9: Using your new RV plug for the first time
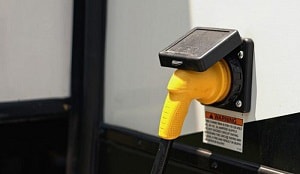
This final step is similar to the section on how to connect your RV to shore power in your RV user manuals. So if you are already familiar with this, you can go on to hook up your RV as usual. But for those who aren’t, first of all, turn off all appliances in your RV. I’d strongly advise against plugging your cord under load. Secondly, turn the shore power breaker or RV breaker OFF. Leaving it on might lead to arc flash and accidental electric shock. Plug your RV cord into the outlet, and only then can you turn the shore power breaker or RV breaker back on.
Conclusion
Knowing how to wire a 50 amp RV plug can be so easy, you must now be motivated to try this out yourself, aren’t you? Personally, being able to do this has solved all my issues, from breaker tripping and overheating to the hassle of using lengthy cable extensions because the 20 amp outlet isn’t even near where my trailer is parked. I hope you benefit from this guide as much as I do.
Should there be any questions or suggestions, please let me know in the comment section below. I would love to hear them or give you further explanations. And if there are people whom you believe would also benefit from this guide, please share it with them. We would much appreciate your effort.
“Hi, I’m Francis’ husband—Calvin. Our story began with our shared passion for traveling. I have had a career journey for over 11 years at Ford Motor Company, where I took on the role of BMS SW Process Engineer.
Together with my wife, I have dedicated countless hours to exploring every nook and corner of the world. Ten years living in an RV may seem long, but time seems to fly by when I’m doing what I love with the person I love.
FMCA’s 103rd International Convention & RV Expo in Gillette, WY,
Like my wife, I hope to help you see the beauty of traveling off the beaten path by sharing insights into this lifestyle. In addition to my corporate roles, I also launched our website – Outdoorbits, in 2015 and continue to contribute my knowledge and skills to the present day. And I’ll be completely honest with you—no hiding the truth or sugarcoating the possible challenges.
So, if you want to run away from the busy lifestyle to embrace nature, I’m your guy.”