Are you bored while staying in your RV and wishing that you had a flat-screen TV in your vehicle? If so, you came to the right article!
Here, you’ll learn how to install a flat screen TV in an RV. I listed the things you’ll need for the installation and a step-by-step guide on how to install your TV in the vehicle while considering different factors.
Page Contents
3 Tips to Install Flat Screen TV in RV
What You’ll Need

In this section, you’ll find everything you need to attach a flat-screen TV to an RV’s wall. Take note that you’ll need most of the items listed below. However, I included some optional tools that can make the installation process easier.
1. TV Mounts
Several types of TV mounts exist on the market, and it pays to know which one is compatible with your desired TV. Additionally, each mount promotes individual and unique benefits.
- Flat wall mount – Also called a flush TV mount, the flat wall mount is a great choice if you want to give your RV a low-profile, minimalist look.
- Tilt mount – Unlike flat wall mounts, tilt mounts have the added benefit of allowing you to tilt the TV. Many of these models can tilt TVs up to 20 degrees to improve viewing angles.
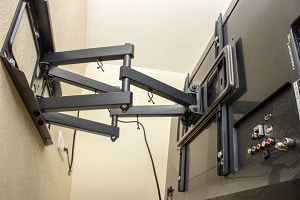
- Articulating TV mount – This type of TV mount for RVs is generally the most popular out of its class because the model can fit almost any flat surface.
Additionally, the variant can extend up to 30 inches. However, this type of mount can be quite costly and does not swivel up and down. Plus, it’s fairly heavy, which makes installation more challenging than usual.
- Full motion TV mount – Known as the flexible TV mount, it allows the TV to tilt and move in any direction. It works seamlessly with most RV models. Like the articulating variant, this type of mount can also be quite expensive.
- Under cabinet mount – This type of TV mount is ideal for flat-screen televisions up to 24 inches wide. This variant can fit under the cabinet of your RV or even under the shelves.
2. Power Drill and Drill Bits

You can still opt to use a conventional hand drill and manual screwdriver to put screw holes in your RV’s walls. However, these traditional tools can become laborious and time-consuming.
Instead, think about spending the extra cash to purchase a power drill and compatible drill bits. Many modern cordless power drills, like the Bosch PS32-02, are great for installing TVs without being tied to a wall socket.
3. Level

One of the issues that you need to prevent is installing your TV skewed. Thankfully, you can choose from different types of levels for this job.
- Box-beam levels – Box-beam levels have slightly angled measuring edges and generally have aluminum or metal constructions. These levels are usable on flat vertical and horizontal
- Magnetic levels – These models have rectangular designs, much like the box-beam levels. However, these options have magnets to help them stay on flat metal surfaces.
- Digital box levels – A digital box level is quite similar to the standard box level, but it has the added advantage of giving you a digital readout.
- I-beam level – An I-beam level is ideal for general light use. This model can last a long time but require frequent checks for accuracy.
- Screed level – Ideal for checking the level of a concrete slab or basement floor. However, it can still work when installing a new TV.
Aside from these levels, you can also choose from other variants, such as torpedo, specialty torpedo, and string levels.
4. Stud Finder
One of the worst things that can happen to you when installing a TV in your RV is drilling a hole in the vehicle’s wall and it’s the wrong spot. A stud finder will help prevent this issue.
A stud finder is a handheld device used to find studs located behind a wall. That way, you can avoid creating an expensive mess while allowing your mount to support the entire weight of the TV.
5. Optional Things to Consider When Installing a TV in Your RV
Aside from the items mentioned above, here are some optional items that you can bring to your TV’s installation process.
- Screw adhesives
- Painters tape
- Cable raceways
Additionally, you can call a friend or family member to help you out with the install procedure. That way, you can save a significant amount of time and effort during the operation and enjoy that piece of technology faster.
Step-By-Step Instructions
How you mount your TV will depend on the kind of RV you own and the location where you want to place it. We got you covered on how to install your TV in your RV while considering the different mounting options.
1. Installing a TV in an RV with an Existing TV Box

- Take the built-in TV box and remove the old tube TV.
- Measure the depth needed for your new wall mount. Use a stud finder if needed. Then, mark the points with a pencil.
- Add 1.63 inches to your initial measurement for the sidewalls.
- Measure the TV box’s height using a tape measure or steel tape.
- Cut two 2×4 pieces of plywood to the desired length. These pieces of wood will act as vertical support for the TV box’s existing horizontal supports.
- Set the two vertical supports on each side of the TV box. Make sure to use at least four screws for each piece for stability.
- Attach the horizontal supports after measuring the desired TV height. This time, use a minimum of eight screws. Also, pre-drill the supports to make sure the screws don’t harm the wood.
- Measure and mark the locations on the horizontal beams where the TV mount will go.
- Pre-drill the holes in your RV’s wall and install your TV mount according to its instructions.
- Attach the TV to the mount.
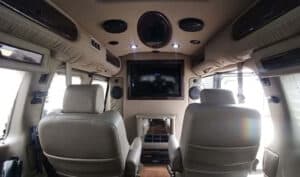
2. Installing a TV in an RV’s Wall

- Find the best position for your TV in your RV’s wall.
- Locate the wall studs using a stud finder. Mark the ideal locations using a pencil.
- Drill the first or pilot holes using the appropriate drill bits. These holes will be for the mounting screws.
- Install the mount to the wall. Make sure to follow the instructions indicated in the kit. If the kit doesn’t have included instructions, you can search online for the guidelines.
- Install the mounting plate to the TV’s back. Then, connect the mounting plate to the mount.
- Connect the TV to the RV’s antenna or satellite dish to receive a signal.
3. Installing a TV in an RV Under a Cabinet
Unlike the other two installation methods, this technique is arguably the easiest of the three. It’s because you only need to follow the mount’s instructions. Attach the mount and TV underneath the cabinet using the right screws and enjoy!
Conclusion
You have now reached the end of this guide. Hopefully, you enjoyed reading this article and have learned how to install a flat screen TV in an RV.
Remember, to acquire all the necessary items before proceeding with the installation process to save yourself time, money, and effort. Then, follow the instructions carefully to avoid mistakes.
What do you think about this guide? Do you have any experience with installing a TV in an RV that you’d like to share? If so, you can leave your thoughts and questions in the comment section to start a discussion.
“Hi, I’m Francis’ husband—Calvin. Our story began with our shared passion for traveling. I have had a career journey for over 11 years at Ford Motor Company, where I took on the role of BMS SW Process Engineer.
Together with my wife, I have dedicated countless hours to exploring every nook and corner of the world. Ten years living in an RV may seem long, but time seems to fly by when I’m doing what I love with the person I love.
FMCA’s 103rd International Convention & RV Expo in Gillette, WY,
Like my wife, I hope to help you see the beauty of traveling off the beaten path by sharing insights into this lifestyle. In addition to my corporate roles, I also launched our website – Outdoorbits, in 2015 and continue to contribute my knowledge and skills to the present day. And I’ll be completely honest with you—no hiding the truth or sugarcoating the possible challenges.
So, if you want to run away from the busy lifestyle to embrace nature, I’m your guy.”