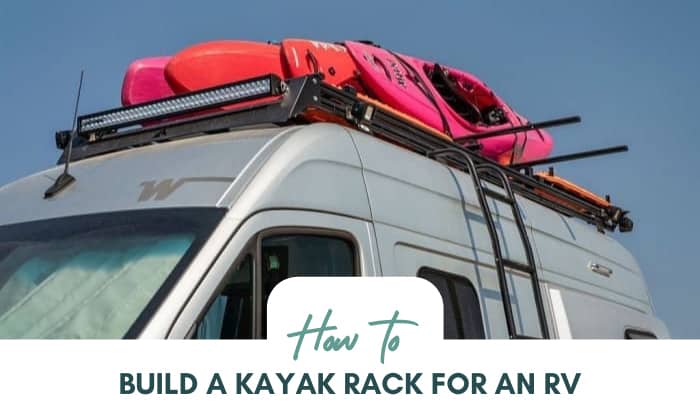
So, you’ve decided to take your adventure to another level by kayaking. However, figuring out how to transport your kayak while traveling in an RV can be trickier than you might think, but that’s where racks come in.
With pieces of pipes and mechanical tools, you can produce a DIY RV kayak rack and even a kayak, bike rack combo. It’s customized, will save you a lot of money, and encourage you to be creative, practical, and resourceful.
If you’re an adventurer at heart, this article will guide you on how to build a kayak rack for an RV so you can bring your kayak anywhere.
Page Contents
Instructions to Build a Kayak Rack for RV
What to Prepare
Here are the materials that you need to build a vertical kayak rack that’s sturdy enough to hold two kayaks and two bicycles. This design can also fit your 5th-wheel kayak rack plans.
- Two (2) pieces of shackle bolts with the dimensions of ⅜” x 4” x 7”
- A six-feet long 1” steel iron angle
- A six-feet long 2 x 2” steel angle
- 2 x 6” wood boards (6’4” long)
- 2 x 6” boards
- 2 x 12” boards
- 2 x 4” wood pieces
- 1 ½ x 1 ½’ aluminum “L” channel
- Two (2) pieces of 1” aluminum channel
- 2 inches U-clamp
- Three (3) anchor loop hold-downs
- ¾” PVC fittings
- ¾” 200-PSI PVC pipe
- ¾” EMT steel pipe
- Spring pinN
Buying a kayak rack for back of travel trailer can put a strain on your financial resources; therefore, constructing your own kayak rack is your best bet if you want to keep your spending in check. This kayak rack can be broken down into five separate parts.
- Camper’s Back Attach Bar
- Bike Rack Stanchions
- Kayak Pads
- Bike Rack Pads
- Bumper Sleeve
Because this is a DIY vertical kayak rack for RV, reinforcing the bumper is essential to preventing accidents from occurring. This is because the rack will be attached to the bumper.
Step-by-Step Guide
Step 1: Camper’s Back Attach Bar
- With your drill, drill five (5) holes at the back portion of your RV where you want to mount the 1” steel angle.
- Drill two sets of ¼” diameter holes on the steel angle for the bike rack stanchions.
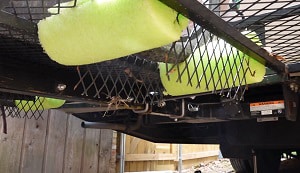
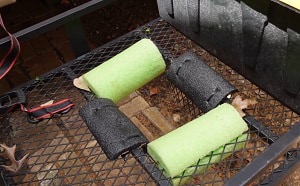
- Put two pieces of 6” long ¾” PVC pipe on the steel angle. Cover it with foam pipe insulation.
- Mount three (3) anchor loop hold-downs for the kayaks.
- To lock the kayaks together, attach a ¾” 200-PSI PVC pipe on both ends of the ¾” EMT steel pipe. Secure both ends with ¾” PVC fittings. One end should be removable and secured by the spring pin when the kayak is already in place.
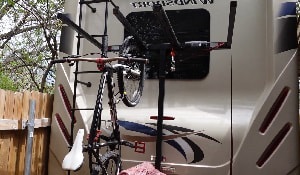
Step 2: Biker Rack Stanchions
Use 2 x 4’’ wood pieces as the top and bottom of the stanchions. Attach the aluminum channels to them and secure everything with bolts and clamps.
Step 3: Bumper Sleeve
- Get the steel angle that measures 2 x 2” and the wood boards that are 2 x 6”. Put some glue on these and then bolt them together to make an “L” structure.
- For RV bumper, make use of the shackle bolts when putting it in place. You may also use glue to further reinforce the structure; polyurethane-based products will work best for attaching wood and metal.
The bumper mount may be the most important part of the rack, since it’s connected to other parts like the kayak and bike pads.
Step 4: Kayak Pads
- Construct the kayak pads with 2 x 12 inches wood boards.
- Bolt the kayak pads on the bumper sleeve. The kayak pads’ backs should extend under the camper bumper and support it.
Step 5: Biking Rack Pads
- Attach each 1” aluminum piece on the 2 x 6 inches boards. These are where the bike’s wheel will settle.
- Screw a 2” U-clamp under the 2 x 6 inches boards.
- Once done, bolt the 2 x 6 inches boards, along with the aluminum channel piece and U-clamps, to the bumper sleeve.
How to Place Your Kayaks and Bikes
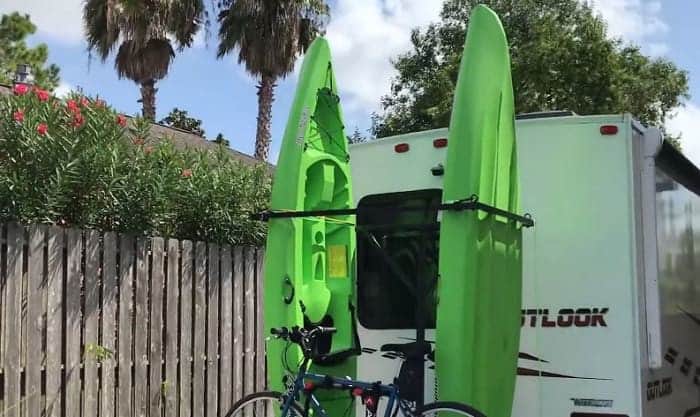
- Position your kayaks so that they stand upright, then place them into the kayak pads and tie them down. You will also have to remove your spare tire if you place it in the back of the RV.
- You should also put your bicycles in a vertical position, or skip the bicycle pads altogether if you don’t want to bring bikes on your trip.
Helpful Tips
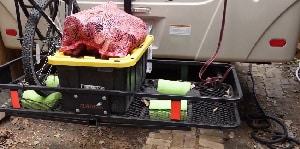
If the steps above are too much for you, there’s an easier way to make a kayak and bike rack with the use of a cargo carrier, bed extender, steel tubes, pool noodles, dual hitch, and anti-rattle stabilizers.
- Attach the cargo carrier to your bumper, and next to it is the bed extender with the hitch receiver — weld the two together.
- Weld steel tubes above the bed extender and form them into something that will act as a divider for the kayak and the bike.
- When storing your kayak and bike, secure them with heavy-duty ropes that can be tied to the steel tubes.
This rack can only hold one kayak and one bike, but you can also store other things on this rack. It is also fixed on your RV, unlike the rack in the steps above, which is detachable.
Conclusion
Building your own RV bumper kayak rack may take a lot of effort and time, but it will definitely save you a lot of money. The advantage of doing so is that you get to customize it to fit the size of your RV, kayak, and bike — you can also decide if it’ll be fixed or detachable.
Whether you’re a gearhead or someone who just wants to save some dime, this project is worth trying. We hope our article helps you learn how to build a kayak rack for an RV. Happy kayaking, everyone!
“Hi, I’m Francis’ husband—Calvin. Our story began with our shared passion for traveling. I have had a career journey for over 11 years at Ford Motor Company, where I took on the role of BMS SW Process Engineer.
Together with my wife, I have dedicated countless hours to exploring every nook and corner of the world. Ten years living in an RV may seem long, but time seems to fly by when I’m doing what I love with the person I love.
FMCA’s 103rd International Convention & RV Expo in Gillette, WY,
Like my wife, I hope to help you see the beauty of traveling off the beaten path by sharing insights into this lifestyle. In addition to my corporate roles, I also launched our website – Outdoorbits, in 2015 and continue to contribute my knowledge and skills to the present day. And I’ll be completely honest with you—no hiding the truth or sugarcoating the possible challenges.
So, if you want to run away from the busy lifestyle to embrace nature, I’m your guy.”