
Taking a road trip in your RV is a relaxing and rewarding experience. Seeing the sights and experiencing the beauty of nature within the comfort of your RV should be experienced by everyone.
But sometimes, unexpected accidents can sour the mood of an otherwise great experience. A leaking shower faucet will do just that, don’t worry because we’ll tell you how to replace an RV shower faucet.
Lucky for you, replacing RV shower faucet is easy as pie. We’ll go over the tools you need and will guide you step by step.
Page Contents
What You Need to Prepare
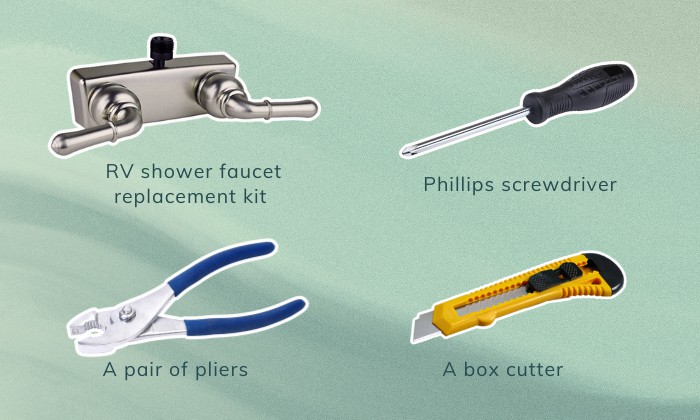
- A brand-new RV shower faucet replacement kit
- A Phillips screwdriver, preferably with a length of 8-inches
- A pair of pliers
- A box cutter
Step 1: Shut off your water supply
First thing first, make sure that the water supply is properly turned off. Turn off your water pump if you’re getting water from the RV’s water tank. If you’re getting it from somewhere else, simply disconnect your RV from the source.
Then, turn on the shower and other faucets until no water comes out.
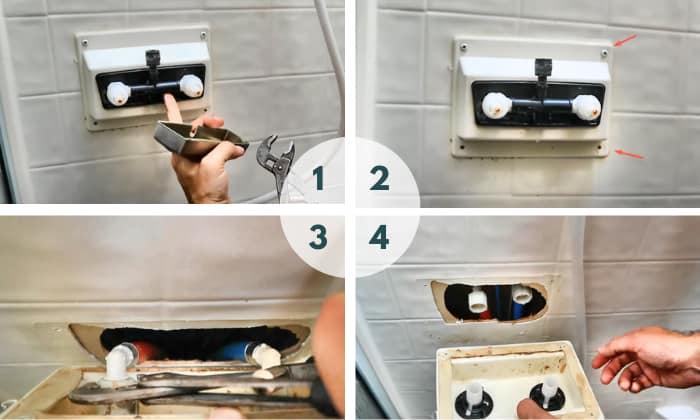
Step 2: Find access panel of the shower faucet and disconnect the water hoses
Most RV’s have a shower access panel located at the rear of the RV. If you cannot find it, check your RV’s model and specification.
If you find out that your RV does not have an access panel, skip this step and move to the next one.
If you can find the panel here’s what you should do:
- Pop the panel open. Looking inside, you’ll see a pair of hoses connected to the back of the motorhome shower faucet. These are the hoses supplying hot and cold water to your shower.
- Unscrew the nuts securing it and detach both hoses. Use your pliers so you can easily uncouple the hoses.
- Now that the hoses are removed, head on inside your RV.
Step 3: Dismount the mounting plate
If your RV is without the access panel, don’t worry and continue forward.
Inside your bathroom, you’ll find the mounting plate of your trailer shower faucet. Remove the shower hose first before detaching the mounting plate.
The mounting plate will be caulked to the wall, making its removal difficult. Use your box cutter to cut through the sides of the mounting plate. This will free it up and allow you to remove it easily.
Afterward, you will use your screwdriver to undo the screws on the sides of the mounting plate. Once you’ve removed the screws, you can dismount the mounting plate.
Once you’ve removed the mounting plate, you can unfasten the nuts securing the body of the shower faucet and remove RV shower faucet.
Step 4: Install the new faucet
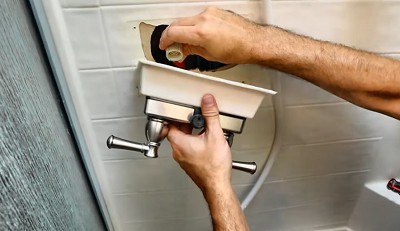
Attach the new shower faucet to the mounting plate, and secure it using the nuts it came with. Reconnect and secure the water hoses to the shower faucet.
Place the mounting plate in its original place and secure it with its screws. Make sure that the mounting plate is leveled and placed just right.
Once the mounting plate is safe and secured, finish it by reattaching the shower hose to the shower faucet.
Step 5: Check all your connections and hose
Now that you’ve installed your new shower faucet, it’s time to switch on your water source and check your connections and hoses.
Ensure thoroughly inspect the edges of your new shower faucet’s mounting plate and knobs. Keep an eye out for any leaks. This goes for water hoses as well.
If you notice an RV shower faucet leaking, use sealants on leaks or tighten the nuts and bolts securing your water hoses.
FAQs
How do I take apart my RV shower faucet?
The first thing you’re going to do is figure out your RV’s parts diagram and determine where its access panel is. Then, switch off your water pump or disconnect your RV from its water source.
Open your access panel and disconnect both hot and cold water hoses, head on inside, and detach the mounting plate of your RV’s shower faucet.
Replace the old one with the new one, put the mounting plate back, connect the water hoses, and switch on your water supply. Easy, right?
How long will it take to replace my RV shower faucet?
This quick and easy fix can be done in 10 minutes or less. As long as you follow the steps outlined, you can easily do this installation with time to spare.
Can you use a regular shower faucet in an RV?
Yes, you can. Regular shower faucets are not that different from your camper shower faucet. However, you may need a faucet adapter, depending on the faucet fittings.
Can I replace the RV shower knob?
Yes, you can. RV shower knob replacement is rather easy, as you just need to know the brand to purchase the right product. Then, unscrew the old one to put on the new one.
It’s the same with replacing an RV shower faucet cartridge if you find your current one broken.
What to do with the RV shower diverter not working?
If your shower valve diverter is broken, your water will trickle, making it impossible to shower. In that case, you can force the water flow by taping the showerhead with vinyl electrical tape.
You will, however, most likely need a new shower faucet.
Conclusion
RV shower faucet repair may be a hassle, but it’s a simple and easy enough task that anyone can do. When in doubt, check your RV’s model to know if it has an access panel and where you can find it.
Before you even pop that panel open, remember to switch off your water source. You will open your access panel and disconnect the hot and cold water hoses.
Remove the mounting plate and switch the old shower faucet with a new one, and now you know how to replace an RV shower faucet.

My career journey has been marked by a variety of roles. I served as a Personal Trainer for Children, Fitness Instructor, and Home-Based Consultant in Detroit Wayne Integrated Health Network.
More than ten years of traveling in my caravan have lent me a deep appreciation of freedom. Without the shackles of being tied down to one place, I get to explore many parts of the world and relish the exhilaration that comes with discovering new things. Throughout my journey, I have been a member of FMCA (Family Motor Coach Association) since 2020. Thus, living on the road has never become boring for me.
As someone with a burning passion for traveling, I want to inspire others to adopt a nomad lifestyle to appreciate the beauty of the world. This, of course, requires a functioning vehicle that can always make you feel at home, even when you’re far away from modern life.
Therefore, I seek to put my experience to good use—helping you with your adventure on the road. As a result, I launched and managed the Outdoorbits website, where I likely share my enthusiasm for outdoor activities and health-related insights.