Getting an RV and maintaining it has varying challenges. Being on the road would mean bumping into stuff and probably experiencing unpredictable weather conditions.
There will be instances when you’ll have to repair RV body damage. This may happen in a time when you don’t have enough budget for RV fiberglass repair cost or when you’re out somewhere without repair shops.
Read on to have an idea and get more information on how to repair RV fiberglass exterior damage.
Page Contents
- Step-by-Step to Repair RV Fiberglass Exterior Damage
- What to prepare:
- Step 1: Identify the cause of the damage and the damaged area/s
- Step 2: Collect the tools and materials that you need.
- Step 3: Sand loose fiberglass off
- Step 4: Place the fiberglass resin and fiberglass mat to the sanded damaged area.
- Step 5: Smooth it out and sand it off.
- Step 6: Polish and paint
- FAQs
- Conclusion
Step-by-Step to Repair RV Fiberglass Exterior Damage
What to prepare:
Prepare the following before you start the task:
- Fiberglass mat or cloth
- Fiberglass resin or epoxy (clear)
- Mixing bowl (for the resin) and stir sticks
- Brush
- Sandpaper (220-grit) / Orbital sander
- Angle grinder
- Paint
- Restoration system (for polishing)
- PPE (gloves, a mask, glasses, shoes, long workwear)
It is always advisable to have RV fiberglass cracking be checked and restore camper exterior by professionals.
These professionals will also help you decide whether the damage can be repaired or whether it will be better off to just get a travel trailer skin replacement.
However, there are instances that it may be beyond your budget, or the scratch and damage are just too minor or small, so it is possible to have a DIY fiberglass repair.
Here is the step by step process you can follow.
Step 1: Identify the cause of the damage and the damaged area/s
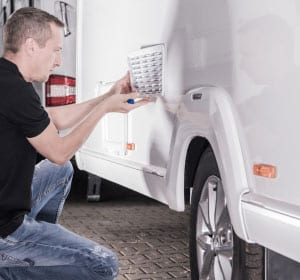
This step is important because you also have to know if you can do it yourself or if you will need a professional to do it for you and avoid further damage.
Checking helps you decide whether it’s fixable or if it’s better to just replace fiberglass siding on the RV altogether.
So, proceed with the job if the damage is manageable with the tools you have. You can also consult a professional, which would be wiser to do – repairing or changing damaged RV siding.
Step 2: Collect the tools and materials that you need.
You need your personal protective gear, including your mask (this is the most important PPE for this task), gloves, long sleeve shirts, long pants, and work shoes.
They are necessary to keep you safe against chemical vapors, fibers, and other hazards while doing the repairs.
Next, gather your necessary tools and repair kit.
Prepare your resin and fiberglass mat or cloth. It is also advisable to read the resin’s instructions carefully so as not to make any mistakes.
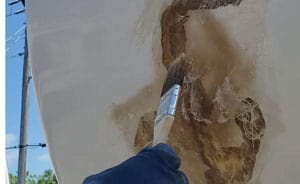
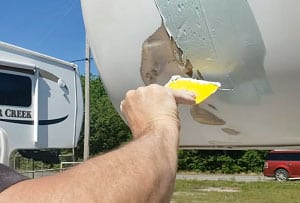
Step 3: Sand loose fiberglass off
Use an angle grinder for sanding off the damaged area. Remove loose fiberglass and paint in the damaged area. You can use grit sandpaper in this step.
Make sure the surface is clean so that the new fiberglass resin and fiberglass mat will stick to that area. Careful not to make the damage worse or put a hole in it. Wipe off dust and dirt.
Step 4: Place the fiberglass resin and fiberglass mat to the sanded damaged area.
Spread the resin generously to the RV fiberglass scratch and around the damaged area.
Soak the fiberglass mat in the fiberglass resin. Make sure that the mat is completely soaked in the fiberglass resin so that it will stick to the RV fiberglass repair panels.
Use a brush to smoothen the fiberglass mat out. Add more fiberglass mats and resin when needed, as you have to ensure the damaged area is fully covered and in shape.
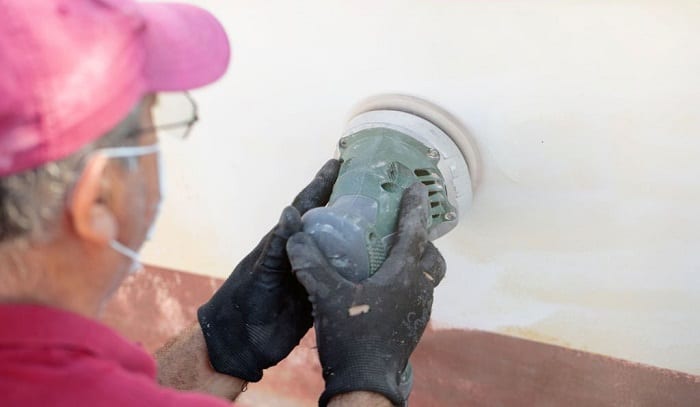
Step 5: Smooth it out and sand it off.
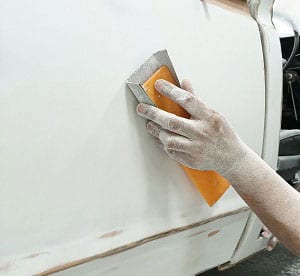
Put as much fiberglass mat and resin as needed. Smooth it out until the RV fiberglass scratch is completely covered using a brush. Let it dry or cure overnight.
Once it has dried out, smooth it out by sanding. Ensure that the fiberglass panels for RV repairs follow the original shape of the area. Using the 220-grit sandpaper in this step is advisable to ensure the surface is smooth.
Step 6: Polish and paint
- Put a fiberglass filler or a body filler in the damaged area covering the small bumps and holes.
- Sand it again.
- Then, choose a paint color that would blend the RV fiberglass siding repair with the rest of the undamaged parts.
- Let the paint dry and polish it after. Using a fiberglass restoration system you’ll be able to restore motorhome fiberglass repair and the rest of the external wall’s shine.
- Note: Check for sign of delamination
Meanwhile, if the problem is related to fiberglass delamination, you need to adress it.
Delamination happens when the outer surface of the RV fiberglass separates from the other layers due to various causes, such as moisture. Small and minor delamination can be repaired with an epoxy resin.
If it’s bad, you should repair RV fiberglass delamination or purchase an RV exterior wall replacement panel.
FAQs
Why are campers made out of fiberglass? Is it durable?
Most RV’s are made up of fiberglass due to a variety of reasons.
1. It is easier to clean.
The plane and smooth surface of fiberglass RVs makes it easier to clean since there are lesser adjoining lines and dents where dirt and dust could hide. Regular car soap or detergent and water can be used to clean and wash fiberglass RVs.
2. It is durable to withstand weather conditions
Fiberglass doesn’t dent easily and can resist harsh weather conditions. Because of the lesser and smaller adjoining lines, it becomes more water resistant and prevents water leaks.
3. Can be easily repaired
As discussed in this article, it is possible to fix fiberglass on your camper. This also means lower maintenance costs.
4. Insulation.
Materials of fiberglass are better in insulators. It can provide a better and more comfortable temperature.
These reasons are valuable and supports an RV’s intended purpose – being outdoors!
Tips to restore the shine on a fiberglass RV
As time passes, an RV’s gel coating and paint may wear off, or oxidation may also build up. This loses the travel trailer fiberglass siding’s shine. To restore the panel, you will have to ensure the following:
1. Sand out the areas where oxidation occurred.
Regularly inspect your RV for oxidation and delamination. Immediately sand out and take care of small cracks and damages to prevent them from worsening.
2. Regularly wash and yearly wax your RV to prevent oxidation and wearing off of the coating.
Despite fiberglass’ durability, there are factors beyond your control, like extreme weather conditions, minor scratches and accidents, and dust and dirt. These can wear off the RV’s coating and paint; hence, washing and waxing can help protect and prevent loss of the fiberglass panels’ shine.
3. Liberally apply fiberglass polish using a microfiber rag on your RV.
Fiberglass polish helps remove oxidation, preventing it from getting worse. A microfiber rag also helps keep the fiberglass shine as it is softer and doesn’t scratch the surface.
Cost to repair RV fiberglass exterior damage
RV delamination, cracks and scratch repairs can be very costly, reaching up to thousands of dollars. It will depend on the professional’s fees as well as how big the damage is.
Hence, if the damage is minor and repairable, diy RV fiberglass repair is advisable. Repair kits can be cheaper, ranging from $100 to $300, but this doesn’t include tools such as an angle grinder.
Conclusion
Like owning a house, a few repairs may sometimes be necessary, which is also true when you own a motorhome. Regular check-ups are crucial to detect minor damages that can still be addressed through DIY repairs. When you own an RV, you should know how to repair RV fiberglass exterior damage and prevent damage.
“Hi, I’m Francis’ husband—Calvin. Our story began with our shared passion for traveling. I have had a career journey for over 11 years at Ford Motor Company, where I took on the role of BMS SW Process Engineer.
Together with my wife, I have dedicated countless hours to exploring every nook and corner of the world. Ten years living in an RV may seem long, but time seems to fly by when I’m doing what I love with the person I love.
FMCA’s 103rd International Convention & RV Expo in Gillette, WY,
Like my wife, I hope to help you see the beauty of traveling off the beaten path by sharing insights into this lifestyle. In addition to my corporate roles, I also launched our website – Outdoorbits, in 2015 and continue to contribute my knowledge and skills to the present day. And I’ll be completely honest with you—no hiding the truth or sugarcoating the possible challenges.
So, if you want to run away from the busy lifestyle to embrace nature, I’m your guy.”