Living in a travel trailer, you may have noticed it is not as easy as it looks to keep things leveled.
Learning how to level a travel trailer on a permanent site ensures safety and stability, allowing you all the comforts and convenience of home in a prime location where your family can have the best times.
If your travel trailer isn’t leveled, you will notice many problems such as trouble sleeping or the poor water flow on your toilets and faucets. If you have issues leveling your travel trailer, this how-to guide will help you accomplish the task.
Page Contents
- 8 Steps to Level Travel Trailer on a Permanent Site
- What to Prepare
- Leveling Your Travel Trailer: A Step-By-Step Process
- Step 1: Choose and prepare your site
- Step 2: Check your travel trailer’s level
- Step 3: Position the leveling blocks
- Step 4: Move your trailer onto the leveling blocks
- Step 5: Install the wheel chocks
- Step 6: Lower the trailer tongue jack
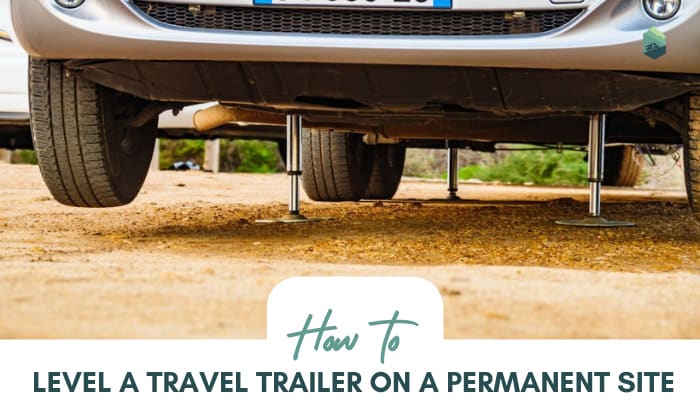
- Step 7: Install stabilizing jacks
- Step 8: Recheck your trailer’s level
- Frequently Asked Questions
- Conclusion
8 Steps to Level Travel Trailer on a Permanent Site
What to Prepare
1. The Correct Spot
The first thing you will need to do is find the correct spot for your trailer. You want to make sure that you have enough room to place levels on the travel trailer at all sides.
2. RV Levels
There are two types of levels that you can use: the bubble type and the Bluetooth type. Both work well to properly level a travel trailer.
However, we recommend using the Bluetooth kind because it’s easier to read and more accurate. The Bluetooth type has a display that shows you how level your trailer is in relation to what it should be when parked on flat ground.
3. Tire Chocks
Tire chocks are typically used on the rear wheels, so the latter can hold up against the weight of your vehicle when it’s permanently parking.
Some owners prefer using chocks on all four wheels for maximum safety against rolling over when parked, especially on uneven ground.
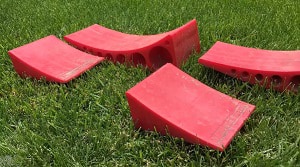
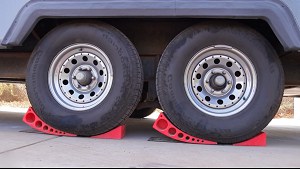
4. Leveling Blocks
These are made of strong plastic and feature interlocking tabs, and are ideal for uneven surfaces. They can be used in combination with wheel chocks to permanently stabilize a camper while on a slope or hillside, or used alone to level your rig at home or in campground parking lots.
If you would only park your travel trailer for as long as a single summer, you can improvise using pressure-treated lumber.
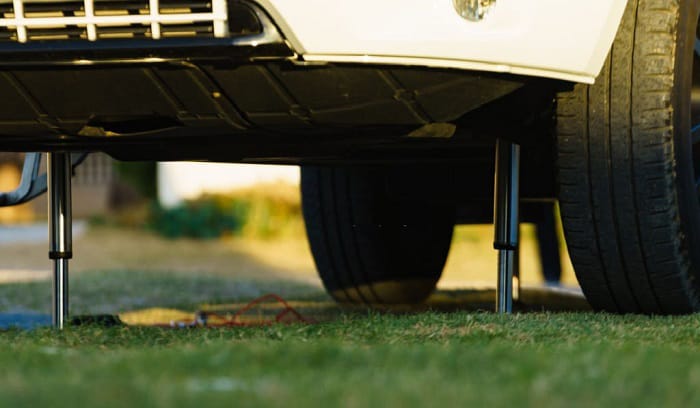
5. Stabilizer Jacks
You also need stabilizing jacks to level a camping trailer. These jacks help lift up one end of your trailer so that you can adjust its height until it’s level with the other end.
6. Tongue Jack Stand
When you level a RV trailer, the tongue jack is your friend. You should have one of these installed on your camper and ready to use before you even start trying to level out your rig.
You can use wooden planks to reinforce your stand since they’re inexpensive.
Leveling Your Travel Trailer: A Step-By-Step Process
Step 1: Choose and prepare your site
Preparing the site where you want to make a travel trailer permanent is important to the leveling process.
If you are renting a concrete slab to park your travel trailer on, you should get rid of any fallen leaves, branches, or sticks that may affect the way your travel trailer is parked. Pick up any dirt, no matter how big or small. Even the smallest of acorns can cause a big difference to the way your travel trailer is leveled.
If you are parking your travel trailer on a raw piece of land, you definitely would want to clean up the area until all that’s left are the grass and soil.
Step 2: Check your travel trailer’s level
Check your travel trailer with a level. Find out where the high and low points are on your RV.
Before you start leveling, make sure that your rig isn’t extended with a slide-out. Doing so will avoid inflicting damage on the mechanism, which would need extensive repair.
Step 3: Position the leveling blocks
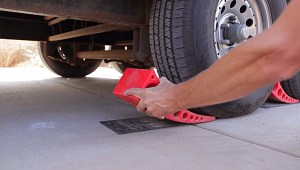
The best way to level a travel trailer is by using modern leveling blocks instead of DIY objects like bricks or concrete blocks.
Position the leveling blocks under each corner of your trailer. The goal is to have them sitting flat on the ground with no wiggle room — there should be little-to-no gap between the bottom of the block and where it touches down on concrete or asphalt.
Step 4: Move your trailer onto the leveling blocks
You’ll need to move your trailer on blocks so that the vehicle is on top of them. Be sure to check as you’re driving to make sure the latter are squarely placed under your tires. All four tires should touch the blocks evenly across their entire widths.
You can get some help from another person who can check the process. Your helping hand should be aware of hand signals and your side mirrors.
Step 5: Install the wheel chocks
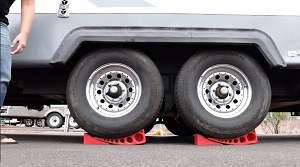
Take your wheel chocks and snuggle them up on your tires to make sure that your travel trailer stays in place. You want to make sure they’re tightly placed and won’t be removed easily by any circumstance.
If you are leaving your travel trailer parked for a long time, make sure to get locking chocks that wouldn’t be pulled out easily by anyone. It’s better to put wheel chocks on both sides to make sure that your travel trailer wouldn’t budge.
Step 6: Lower the trailer tongue jack
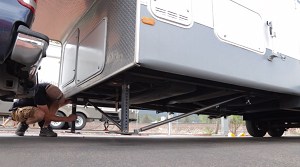
Make sure to give your tongue jack a solid footing by placing a large paving stone or pressure-treated lumber where you will lower it down. This process will prevent your tongue jack from sinking.
Place a level close to the center of your trailer. Get someone to check the bubble as you lower down the tongue jack.
To give your trailer a stable level, you can put stabilizer jacks on the four corners of it. This tool will help prevent your trailer from rocking or moving and lighten the burden on the tongue jack.
Step 7: Install stabilizing jacks

The jacks should be installed as close to level as possible without touching anything under them (such as pipes). They should be spaced evenly between the center line of each wheel and the front bumper if possible.
Step 8: Recheck your trailer’s level
Once you complete the process, check your RV level both front to back and side to side. It’s important that all four wheels are at the same height so that your RV has a level stance.
If one tire is slightly higher than another, it can cause damage to other parts of your RV, such as the roof or even internal mechanics
All the above steps work for a 5th wheel permanent setup as well.
Frequently Asked Questions

Why do I need to level my travel trailer on a permanent site?
Leveling the trailer will ensure that your tires wear evenly and that there is no damage to the axles or suspension system. It will also help prevent any leaks from occurring in the plumbing or septic system.
What is the easiest way to level a travel trailer?
A tool like LevelMate Pro is an excellent choice for leveling your travel trailer when you’re parked on a fixed site. The device works by mounting directly to your vehicle and measuring how far off level it is.
It then tells you exactly how much height needs to be added or removed from each side of the vehicle to bring it into alignment.
Where to place levels on a travel trailer?
Most people think they should put leveling jacks at the front corners of their trailers, but this isn’t always true.
More often than not, you’re going to want to place your levels at multiple points throughout your travel trailer in order to find its center of gravity. Examples would be the center of both the back wall and sidewall.
Can you put a travel trailer on a permanent foundation?
The short answer is yes, you can put a travel trailer on a permanent foundation made out of concrete or wood blocks. If you’re going to be staying in one spot for a while, this can be a cost-effective way to make your travel trailer feel more like home.
Are permanent travel trailer spots level?
No. A permanent campsite can have slopes or even holes in the ground that make it impossible to park your camper.
You need to know how to level your travel trailer on a permanent site so that you can use it as long as possible and enjoy your time off camping.
Conclusion
Whether you’ve just purchased an RV or if you’re looking for ways to park your vehicle, knowing how to level a travel trailer on a permanent site will help ensure that it stays in good condition and is safe to drive.
It may take some time and effort, but once you have mastered these steps, leveling will become second nature during every trip! Following this guide should help you achieve the level of stability that you want from your travel trailer.
“Hi, I’m Francis’ husband—Calvin. Our story began with our shared passion for traveling. I have had a career journey for over 11 years at Ford Motor Company, where I took on the role of BMS SW Process Engineer.
Together with my wife, I have dedicated countless hours to exploring every nook and corner of the world. Ten years living in an RV may seem long, but time seems to fly by when I’m doing what I love with the person I love.
FMCA’s 103rd International Convention & RV Expo in Gillette, WY,
Like my wife, I hope to help you see the beauty of traveling off the beaten path by sharing insights into this lifestyle. In addition to my corporate roles, I also launched our website – Outdoorbits, in 2015 and continue to contribute my knowledge and skills to the present day. And I’ll be completely honest with you—no hiding the truth or sugarcoating the possible challenges.
So, if you want to run away from the busy lifestyle to embrace nature, I’m your guy.”