Page Contents
You’re now a proud owner of an RV, and you want to have a slide-out awning. Now you’re wondering how to install RV slide out awning, especially if you’re a complete beginner at this endeavor.
Not to worry because you’re now at the right place. Here, you’ll learn about the things you need for a proper installation process.
Continue reading, and check out the step-by-step guide on how to install that RV accessory properly.
Detailed Steps to Install Slide Awning
What You’ll Need
No RV installation project will be complete without the use of proper equipment. In this section, each important tool for the upcoming job will be explained in detail.
- RV Slide Awning Kit
If your RV doesn’t have a slide awning kit from the moment you purchased the vehicle, you can buy one from respectable retailers. One excellent example is the Carefree of Colorado Alpine Slide Out Awning Kit.
Kindly note that the slide-out awning you purchase should be compatible with your vehicle. Generally, you’ll know if it’s compatible with the product’s size. Therefore, ensure that you measure the area where the awning goes before finalizing the purchase.
For example, your RV’s slide has a length of 149 inches. If so, a 13-foot slide-out awning should fit in that location.
- Butyl Tape
Butyl tape has a synthetic rubber construction. It’s sticky and can quickly attach to most surfaces. Its flexibility and high adhesion level make it a good choice for bonding various applications, such as fiberglass and rubber.
You can opt to use other adhesives. However, butyl tape is a suggested option because of its bonding strength. It’s even more adhesive than more affordable options, such as those with acrylic or silicone bases.
Furthermore, reliable butyl tapes have a fairly high amount of UV resistance. Therefore, you can have peace of mind, knowing that the hot sun won’t ruin the tape’s bond.
- Flexible Sealant
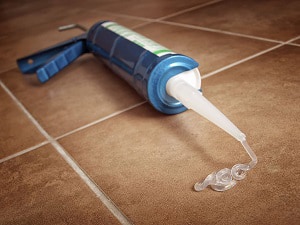
Also called an RV caulk, a flexible sealant helps fill gaps and holes in your rig. It helps create watertight seals, reduces overall energy costs, and protects your motorhome or travel trailer from certain outdoor elements.
But you should be vigilant as unreliably RV flexible sealants exist on the market. These low-quality models lure you in with their attractively low prices. However, these sealants don’t present you with satisfactory results.
Instead, consider paying money for a slightly more expensive flexible sealant. That way, you’ll make sure that the seals you make during the installation of your RV slide-out awning will always stay.
Other Tools to Consider
Aside from the items mentioned above, make sure your tool kit also has the following items:
- Tape measure or steel tape
- Pencil
- Drill with appropriate drill bits
- Ladder
- Level
- Extra screws (optional)
You’ll need these pieces of equipment to help you in achieving a proper installation procedure for your RV slide-out awning. Although you can accomplish the installation without things like a tape measure or pencil, you’ll be at a high risk of making errors.
Step-by-Step Instructions
After acquiring the necessary items, it’s time to proceed with the installation of the slide-out awning to your rig. Make sure to follow these steps to experience a proper installation process.
Step 1: Check the Package

One of the last things that you don’t want to happen is to find out that some parts are missing when you’re doing the installation. Therefore, check the items during the package’s unboxing for completeness.
For example, some retailers may forget to put the correct number of screws in the box. If so, you may need to take a quick trip to your local hardware store to purchase the lacking items.
Step 2: Measure the Location
Take note that you can never be too sure about a proper RV slide-out awning installation. Therefore, you may need to measure the area where the slide-out awning will go before installing the accessory.
Step 3: Prepare the Awning
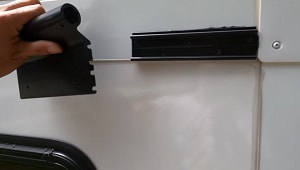
Next, take your butyl tape and line it at the back of the railing. Apply some flexible sealant or caulk to the same location for the extra bond. Make sure to follow the lines or marks on the awning when applying tape or caulk to avoid making a mess.
If your awning doesn’t come pre-drilled, drill the holes with appropriately sized drill bits. Insert the screws into each hole and apply a small amount of sealant on each of them for security.
Step 4: Add the Mounting Brackets
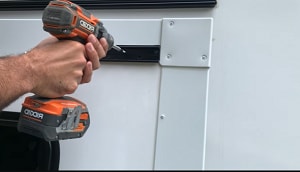
Take the mounting brackets (which should come with the slide-out awning kit) and put them in the slide-out room. Make sure to mark the sliding location for the pilot holes with a pencil.
Take your flexible sealant or caulk again and add some of the product behind the brackets. Align the brackets with the marks carefully. Take as much time as you want for this step as it can lead to costly errors.
Step 5: Add The End Cap Extensions to the Mounting Brackets
Don’t install the screws to the mounting brackets yet. Instead, add the end cap extensions to the latter first. In turn, you should now make sure everything’s in a favorable position.
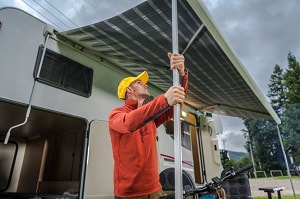
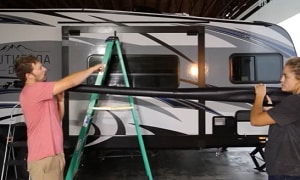
Step 6: Put the Awning Tube in the Rail
Next, you should see a cord; follow that cord when you’re sliding the awning tube along the rail. This step might be difficult to do with one pair of hands. Call a friend, family member, or someone nearby to help you if needed.
Also, ensure that the awning doesn’t sag. Otherwise, it won’t open or close properly.
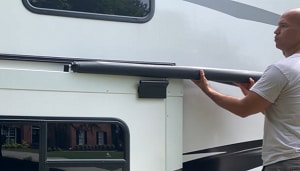
Step 7: Finishing Touches
Use shoulder screws to secure the awning and the end cap extensions. Use your level to check the location of every part to ensure they’re in proper alignment. Once satisfied, secure the end caps underneath each bracket.
Remove the cotter or spring locking pin once everything is secure. Again, take your time because removing this part quickly can make the bracket and awning slip.
Related:
What to Look for When Buying an RV Slide-Out Awning

After reading the step-by-step guide, you might still be looking for the right slide-out awning for your RV. Here are the essential factors you need to consider while you’re shopping.
- Materials: Not every awning fabric is made the same. Some reliable awning materials are sufficiently sturdy to handle different conditions.
- Costs to value ratio: Think about this factor by evaluating the relative cost and experience brought by the awning. The price of the product should follow the value it brings.
- Additional Features: Different RV awning brands make attempts to separate their products from the crowd. These companies create unique awnings with distinct features like automatic extensions and customizable fabric to attract different customers.
Final Words
Did you enjoy this step-by-step guide on how to install RV slide out awning?
In summary, ensure that you have the right awning kit for your rig. Then, secure the necessary items for the project, such as butyl tape, flexible sealant, and a ladder.
Also, don’t be hasty in installing the RV awning. Installing the item to your rig without care and patience can lead to costly mishaps.
What do you think of this guide? If you have questions or feedback you’d like to share, feel free to start a discussion in the comment section.
“Hi, I’m Francis’ husband—Calvin. Our story began with our shared passion for traveling. I have had a career journey for over 11 years at Ford Motor Company, where I took on the role of BMS SW Process Engineer.
Together with my wife, I have dedicated countless hours to exploring every nook and corner of the world. Ten years living in an RV may seem long, but time seems to fly by when I’m doing what I love with the person I love.
FMCA’s 103rd International Convention & RV Expo in Gillette, WY,
Like my wife, I hope to help you see the beauty of traveling off the beaten path by sharing insights into this lifestyle. In addition to my corporate roles, I also launched our website – Outdoorbits, in 2015 and continue to contribute my knowledge and skills to the present day. And I’ll be completely honest with you—no hiding the truth or sugarcoating the possible challenges.
So, if you want to run away from the busy lifestyle to embrace nature, I’m your guy.”